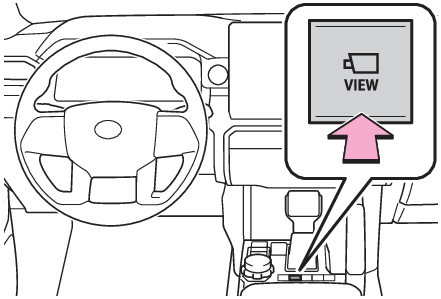
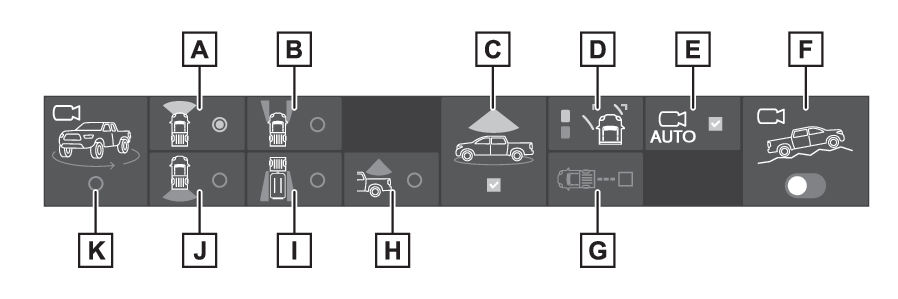
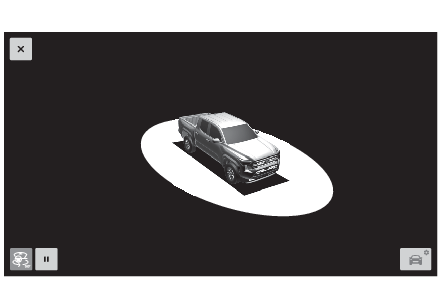
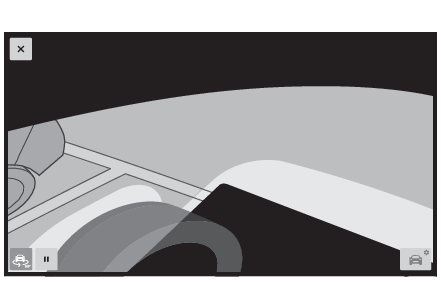
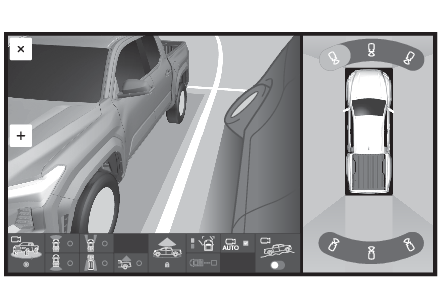
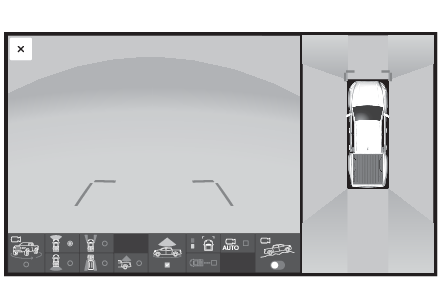
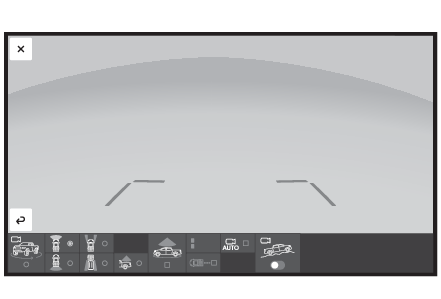
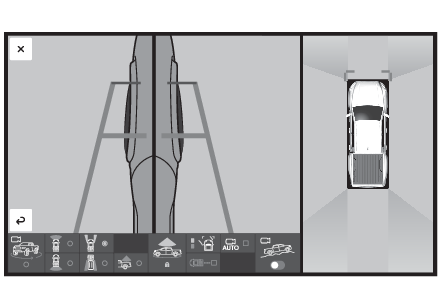
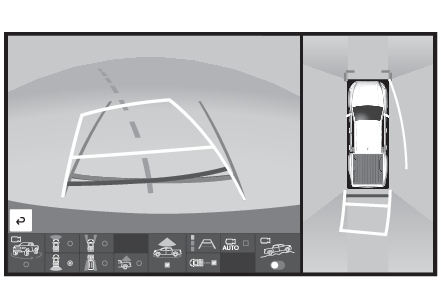
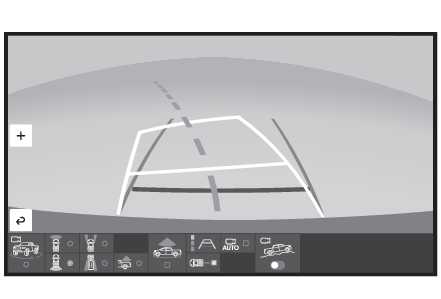
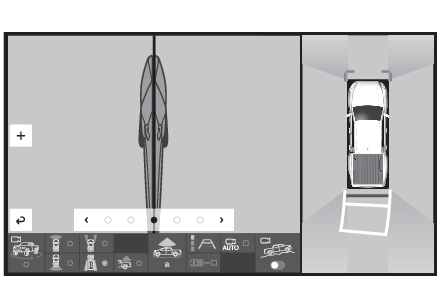
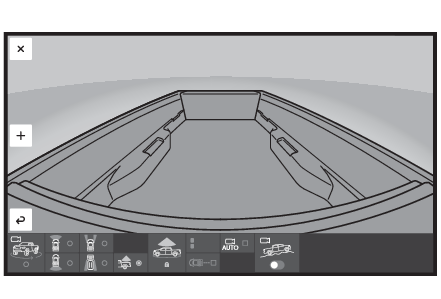
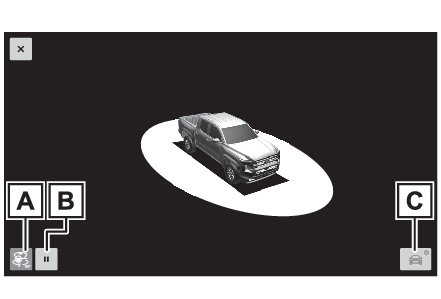
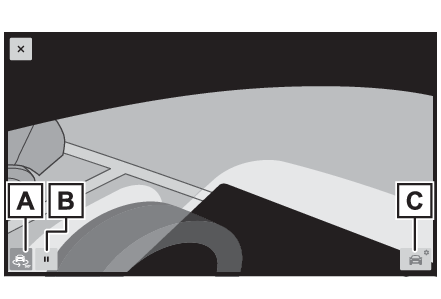
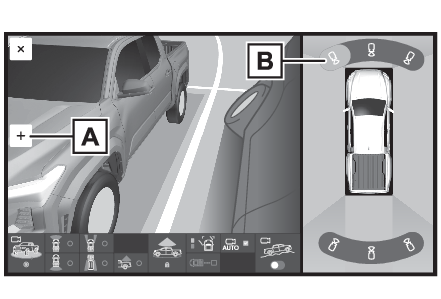
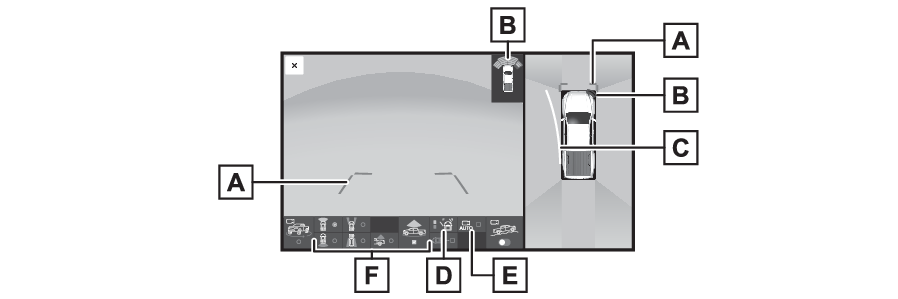
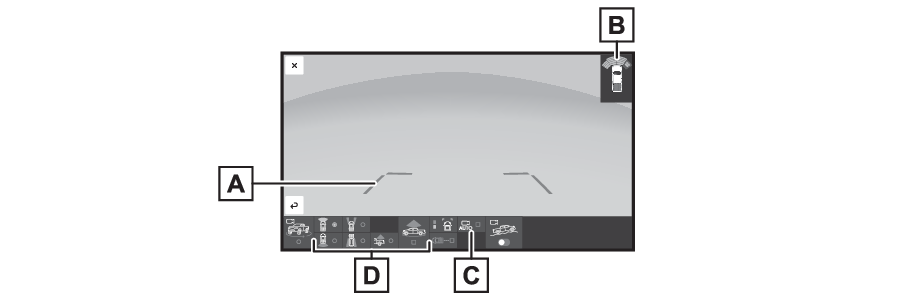
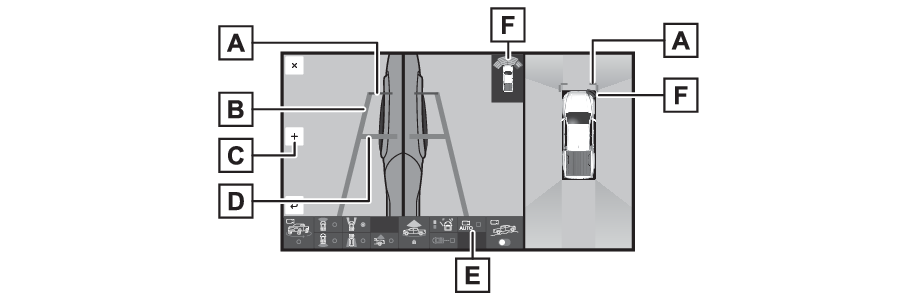
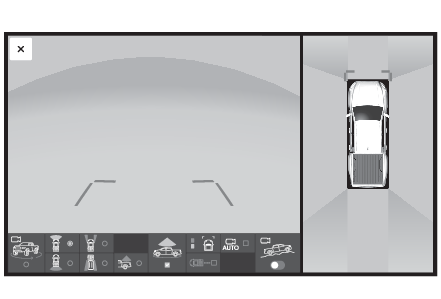
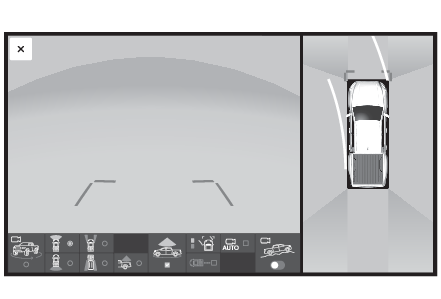
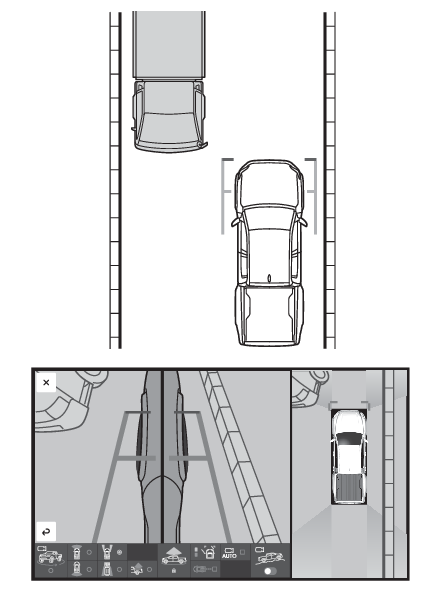
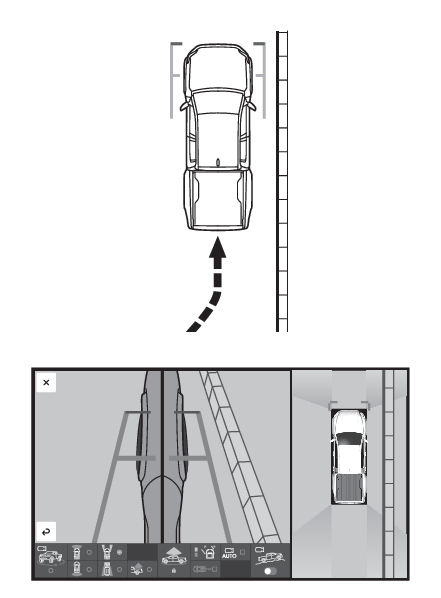
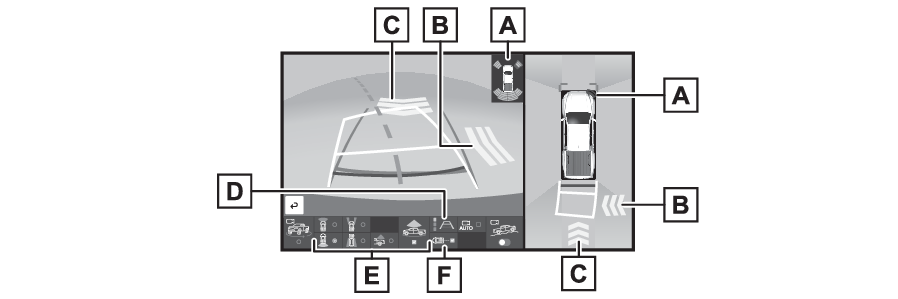
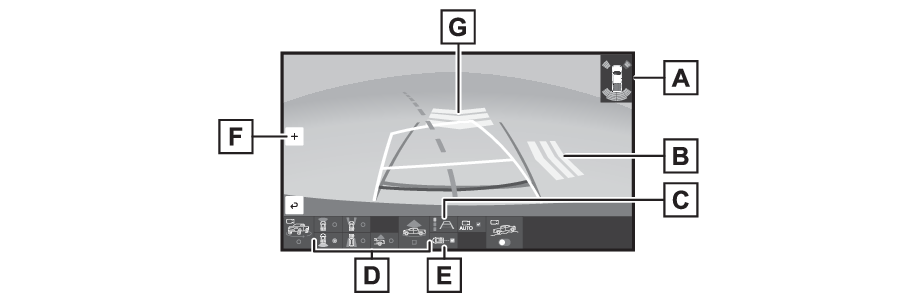
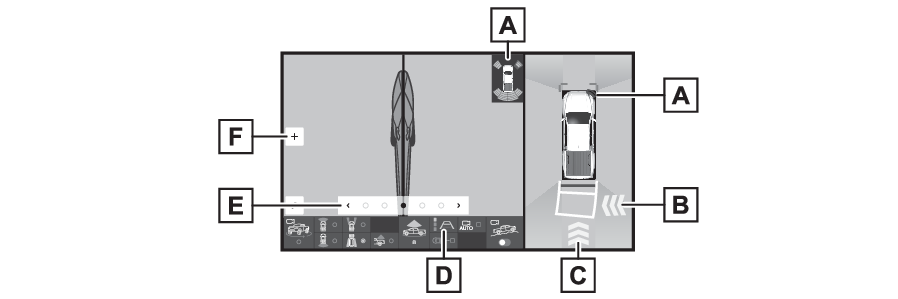
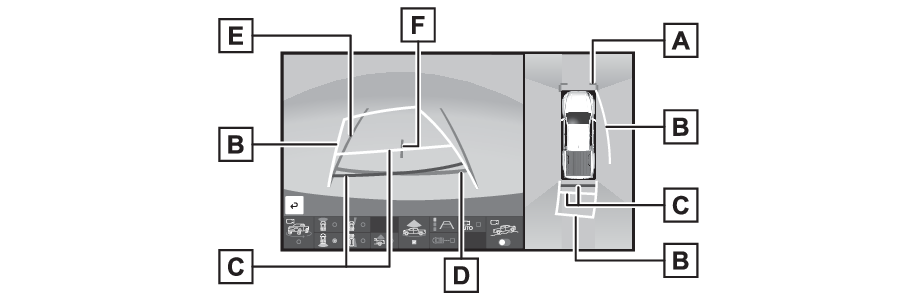
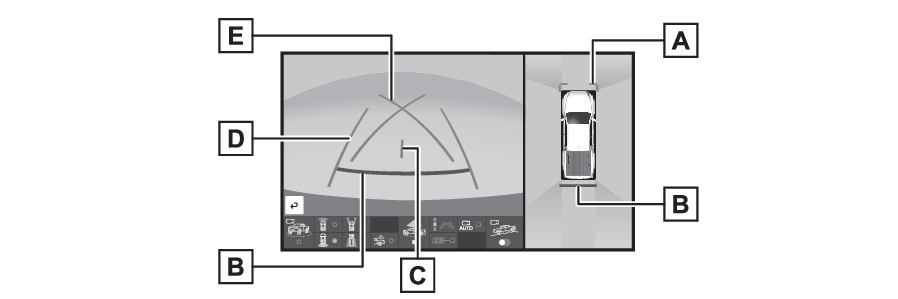
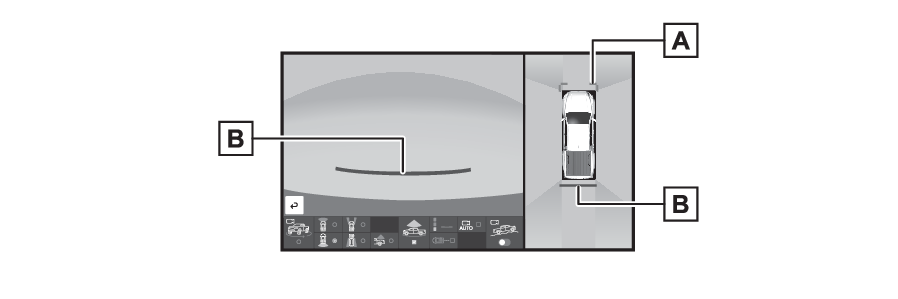
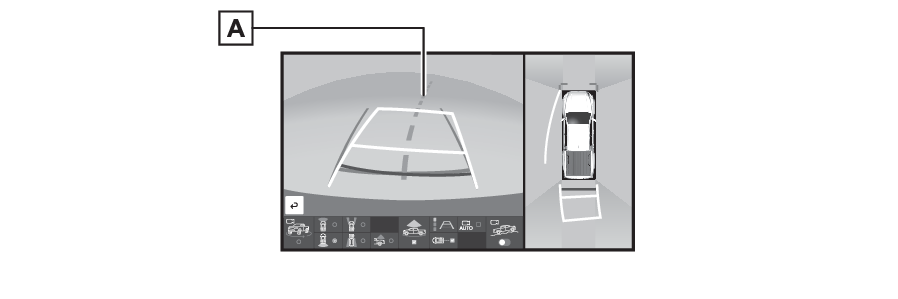
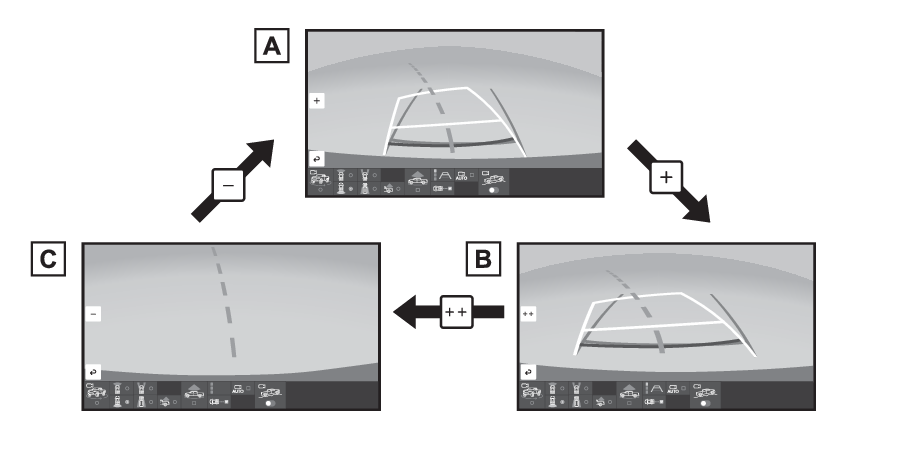
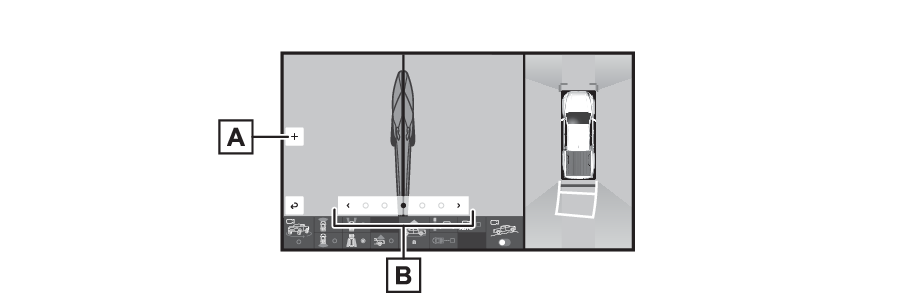
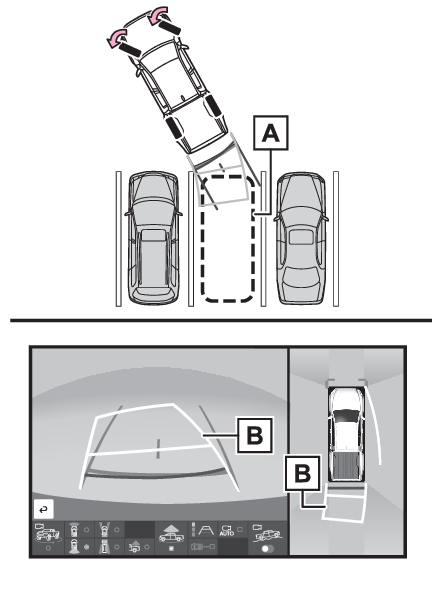
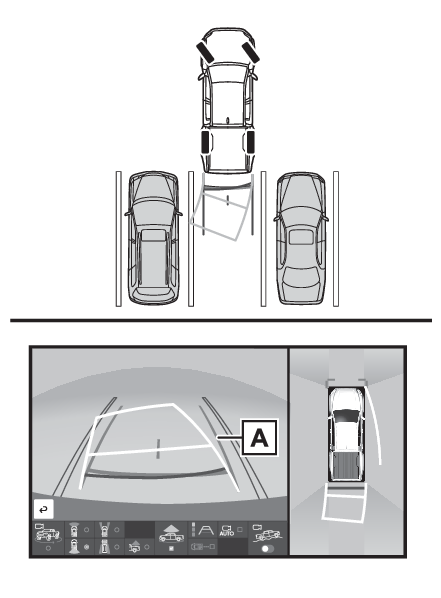
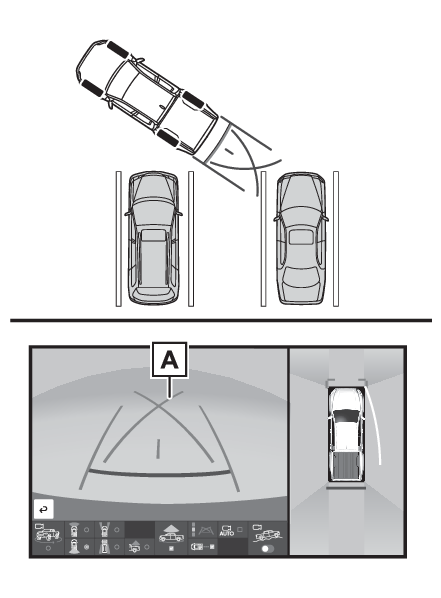
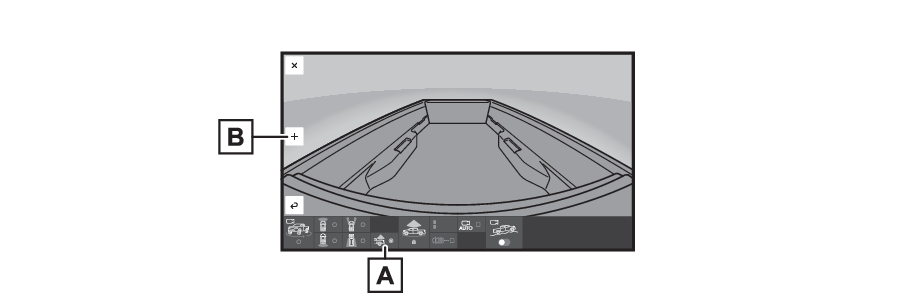
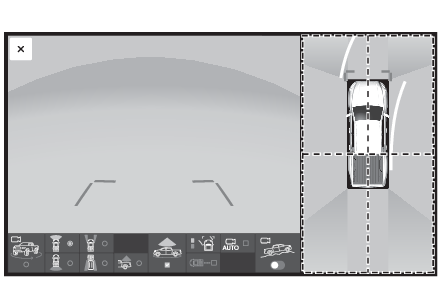
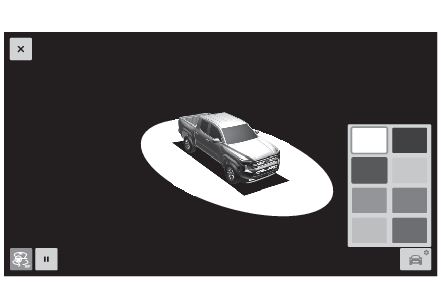
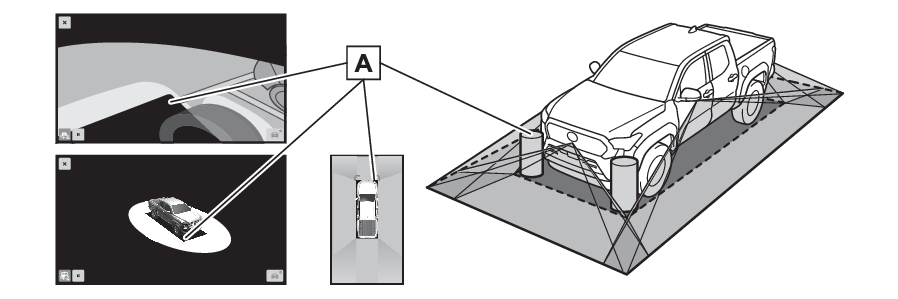
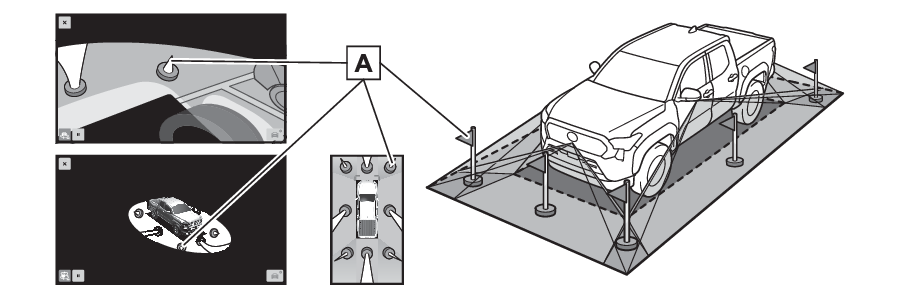
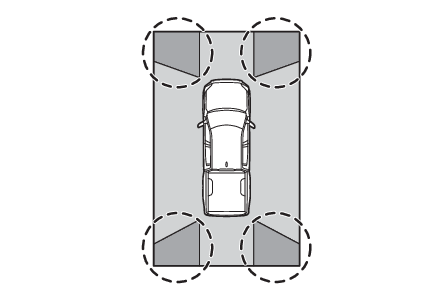
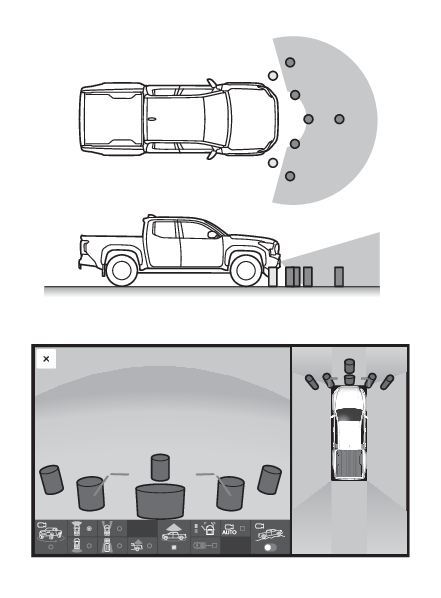
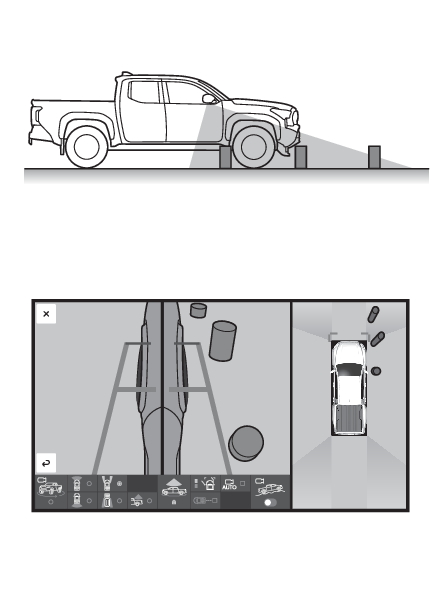
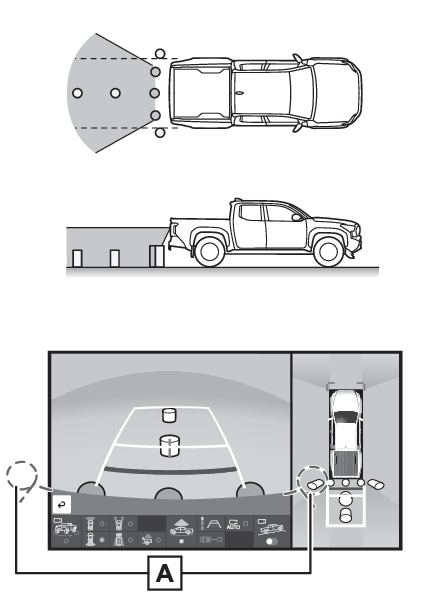
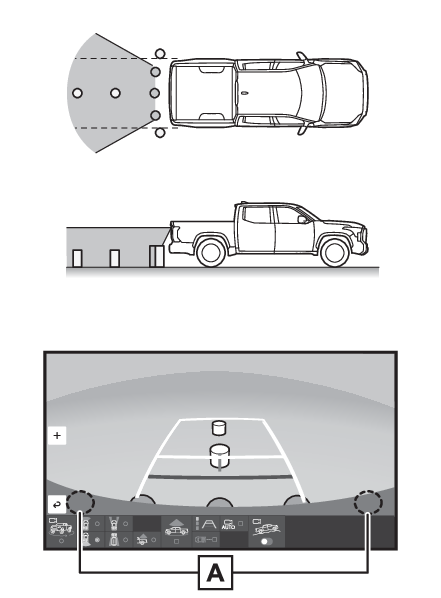
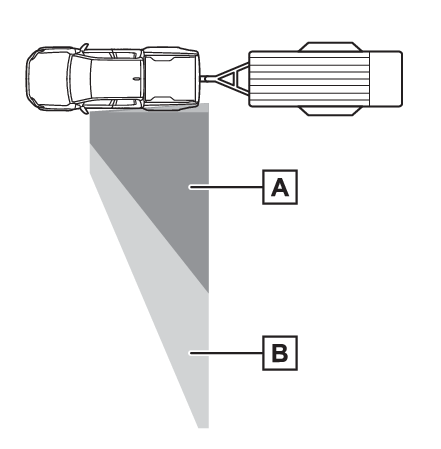
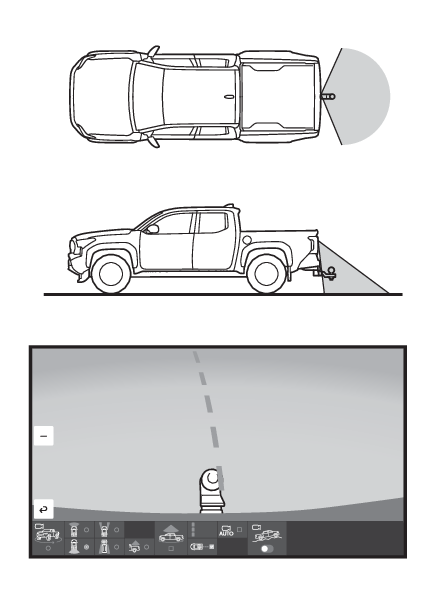
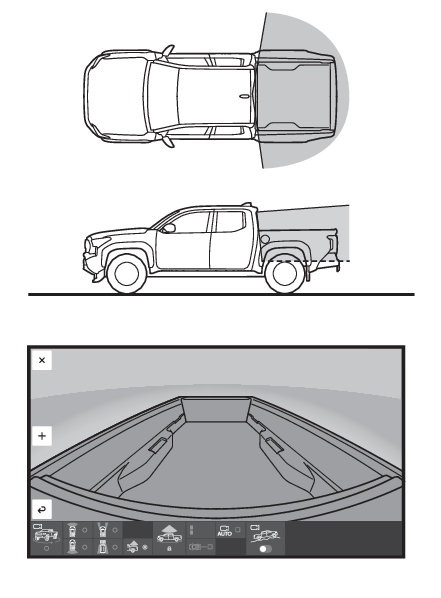
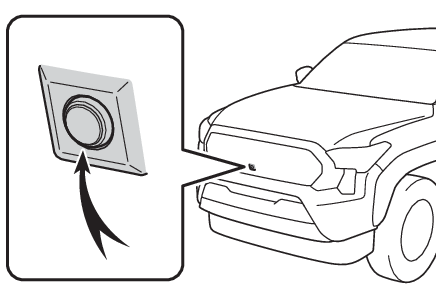
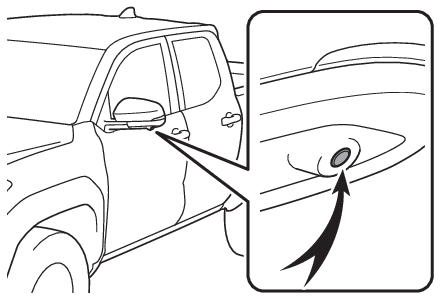
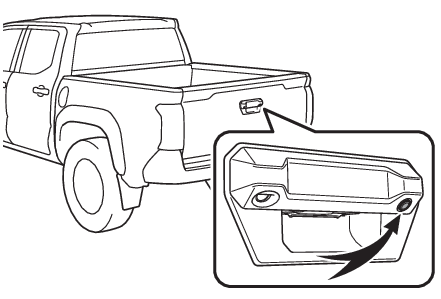
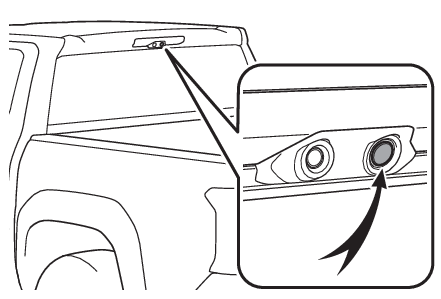
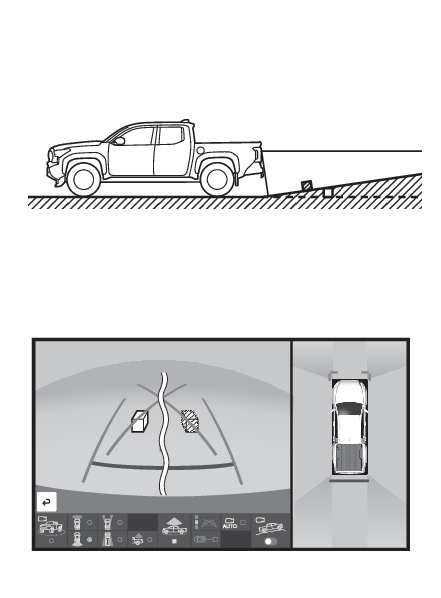
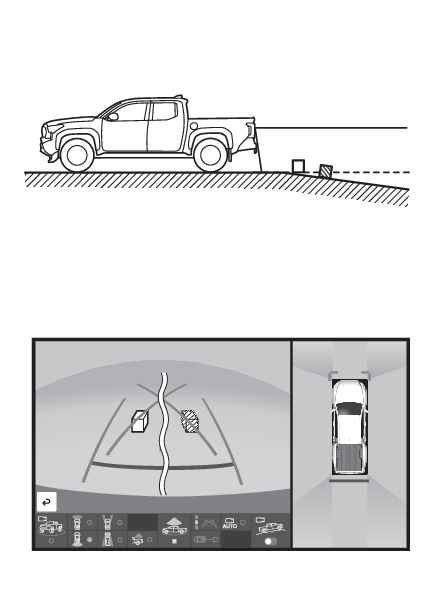
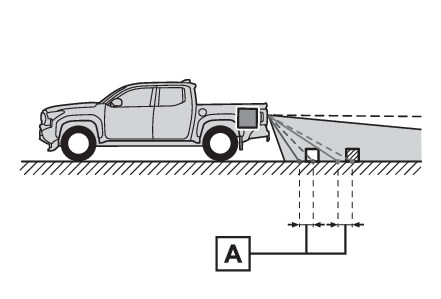
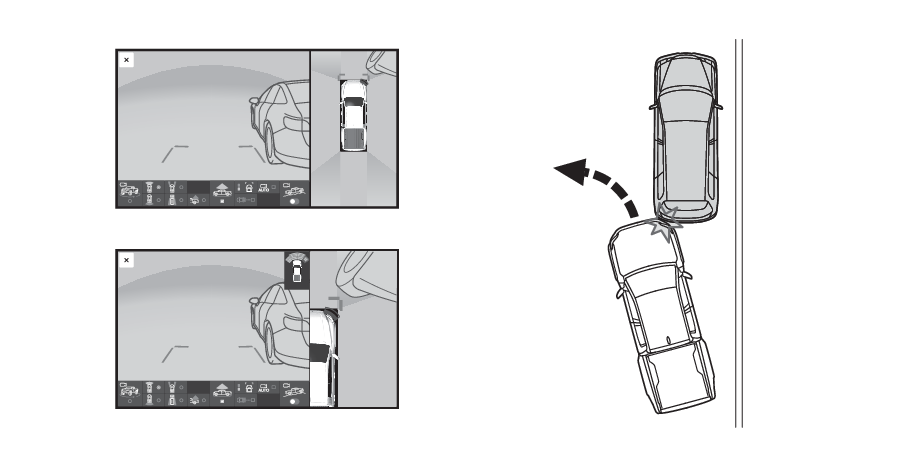
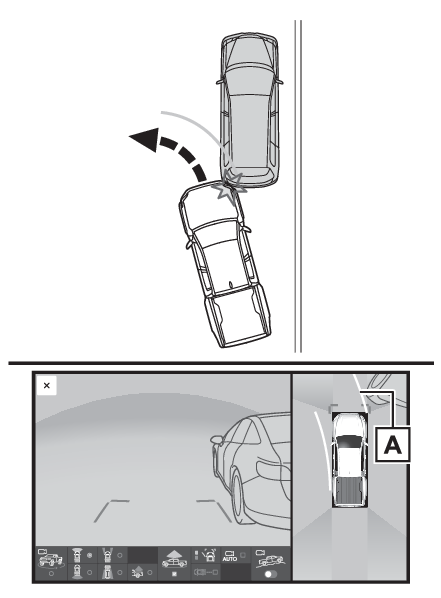
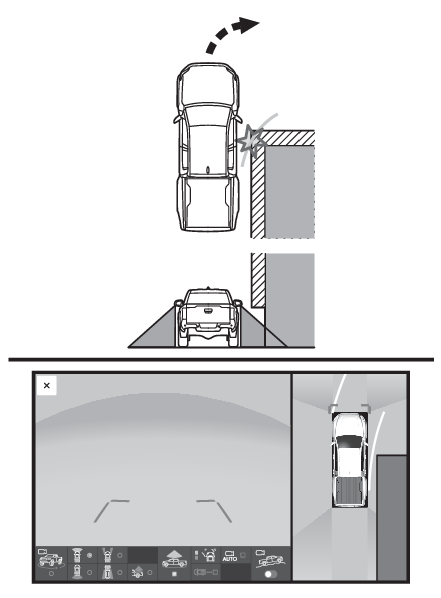
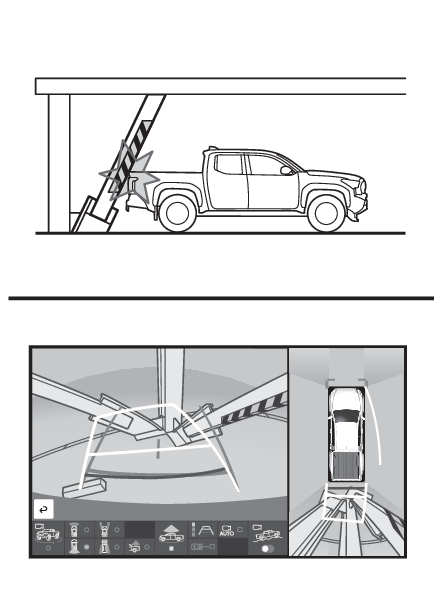
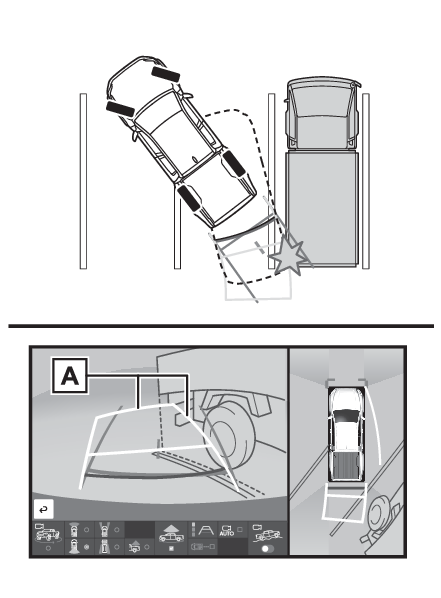
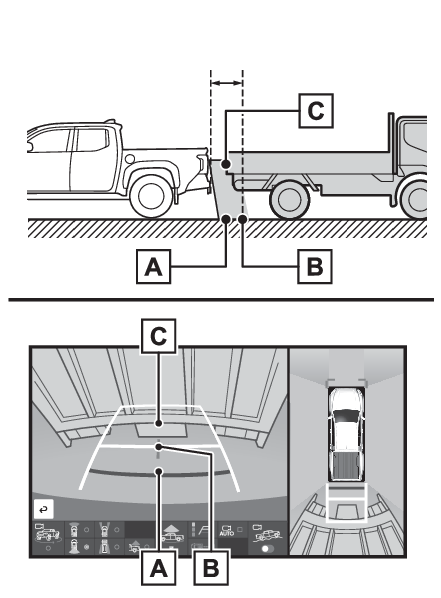
Panoramic view monitor* *If equipped Panoramic view monitor assists the driver in viewing the surroundings, when operating at low speeds, by combining the front, side and rear cameras and displaying a complete vehicle overhead image on the screen. When you press the camera switch or shift the shift lever to R while the engine switch is in ON, the panoramic view monitor operates. The monitor displays various views of the position and surroundings of the vehicle. Note: The screen illustrations used in this text are intended as examples, and may differ from the image that is actually displayed on the screen. Panoramic view monitor Driving precautions Driving precautions The panoramic view monitor is a supplemental device intended to assist the driver when checking around the vehicle. When using, be sure to visually check all around the vehicle both directly and using the mirrors before proceeding. If you do not, you may hit another vehicle or possibly cause an accident. Pay attention to the following precautions when using the panoramic view monitor. Warning: Never depend on the panoramic view monitor entirely. The image and the position of the guide lines displayed on the screen may differ from the actual state. Use caution just as you would when driving any other vehicle. Always make sure to check all around the vehicle with your own eyes when driving. Never drive while looking only at the screen as the image on the screen is different from actual conditions. If you are driving while looking only at the screen, you may hit a person or an object, resulting in an accident. When driving, be sure to check the vehicle’s surroundings with your own eyes and the vehicle’s mirrors. Depending on the circumstances of the vehicle (number of passengers, amount of luggage, etc.), the position of the guide lines displayed on the screen may change. Be sure to check visually around the vehicle before proceeding. Do not use the panoramic view monitor system in the following cases: On icy or slick road surfaces, or in snow When using tire chains or emergency tires When the front doors or the tailgate is not closed completely On roads that are not flat or straight, such as curves or slopes If the suspension has been modified or tires of a size other than specified are installed In low temperatures, the screen may darken or the image may become faint. The image could distort when the vehicle is moving, or you may become unable to see the image on the screen. Be sure to visually check all around the vehicle both directly and using the mirrors before proceeding. If the tire sizes are changed, the position of the guide lines displayed on the screen may change. The camera uses a special lens. The distances between objects and pedestrians that appear in the image displayed on the screen will differ from the actual distances. (Difference between the screen and the actual road) When an aftermarket part is installed in the display area of the screen. Notice: In panoramic view/moving view/see-through view, the system combines images taken from the front, back, left and right side cameras into a single image. There are limits to the range and content that can be displayed. Familiarize yourself with the characteristics of the panoramic view monitor system before using it. Image clarity may decline at the four corners of the panoramic view/moving view/see-through view. However, this is not a malfunction, as these are the regions along the border of each camera image where the images are combined. Depending on lighting conditions near each cameras, the panoramic view may show different colors for each camera area. The panoramic view/moving view/see-through view display does not extend higher than the installation position and image capture range of each camera. There are blind spots around the vehicle. Accordingly, there are regions not displayed in panoramic view. Three-dimensional objects displayed in wide front view, rear view or side view may not be displayed in panoramic view/moving view/see-through view. People and other three-dimensional obstacles may appear differently when displayed on the panoramic view monitor. (These differences include, among others, cases in which displayed objects appear to have fallen over, disappear near image processing areas, appear from image processing areas, or when the actual distance to an object differs from the displayed position.) When the tailgate, which is equipped with the back camera, or front doors, which are equipped with door mirrors that have built-in side cameras, are open, images will not be displayed properly on the panoramic view monitor. When the outer mirrors are not positioned in normal position, images will not be displayed properly on the panoramic view monitor. The vehicle icon displayed in panoramic view/moving view/see-through view is a computer generated image. Accordingly, properties such as the color, shape and size will differ from the actual vehicle. For this reason, nearby three-dimensional objects may appear to be touching the vehicle, and actual distances to three-dimensional objects may differ from those displayed. Panoramic view monitor Camera switch Camera switch The camera switch is located as shown in the illustration. Panoramic view monitor Menu button Menu button The screens which are displayed from the following buttons can be selected. Also, the display can be changed to various screens from button combinations. The button display changes due to the situation of the vehicle, such as the screen and speed being displayed, shift position, vehicle equipment, etc. The menu button is displayed when the shift lever is in D, N, R (automatic transmission) or with parking brake disengaged (manual transmission). Front view button Front split view button Panoramic view on/off button Guide line select button (Switching the guide line mode (panoramic view & front view mode),Guide lines displayed on the screen) Auto mode on/off button (Automatic display mode) Multi-terrain Monitor on/off button (Multi-terrain Monitor*) Center guide line on/off button (Guide lines displayed on the screen) Bed view button (Checking the bed) Rear split view button Rear view button 3D view button Panoramic view monitor Display Display Checking around the vehicle When the shift lever is in P (automatic transmission) or not R and with the parking brake engaged (manual transmission). Moving view Press . See-through view Press . 3D view Press . Checking the front and around the vehicle When the shift lever is in a position other than P (automatic transmission) or with the parking brake disengaged (manual transmission). Panoramic view & front view Select the front view button and then turn ON the panoramic view button. Wide front view Select the front view button and then turn OFF the panoramic view button. Front split view Select the front split view button. Checking the rear and around the vehicle When the shift lever is in a position other than P (automatic transmission) or with the parking brake disengaged (manual transmission). Panoramic view & rear view Select the rear view button and then turn ON the panoramic view button. Wide rear view Select the rear view button and then turn OFF the panoramic view button. Rear split view Select the rear split view button. Checking the bed Select the bed view button. Panoramic view monitor Checking around the vehicle Checking around the vehicle The moving view screen and the see-through view screen provide support when checking the areas of around the vehicle while parking. These screens display an image of the vicinity of the vehicle combined from the 4 cameras. The screen will display a 360° view around the vehicle from either inside the vehicle or from a birds-eye view at an angle. To display the moving view/see-through view screen, press when the shift lever is in P (automatic transmission) or not R with the parking brake engaged (manual transmission) and the intuitive parking assist is enabled. Screen display Moving view See-through view Display mode switching button Select to change the display mode between the moving view and the see-through view. Rotation pause switch Select to pause the rotation of the screen. To resume rotation, select . Body color setting switch Select to display the body color setting screen and change the color of the vehicle displayed on the panoramic view monitor. (Customizing the panoramic view monitor) 3D view The 3D view provides support when checking the areas in around the vehicle perimeter in confined areas. The display position of the 3D view can be changed by pressing the six different camera angle switches. To display the 3D view, select the 3D view button (Menu button) after pressing except in the P range. Zoom button Camera angle SW The display position of the 3D view can be changed Note: Pressing on the screen or again changes the screen back to the previously displayed screen, such as the navigation screen. Panoramic view monitor Checking the front and around the vehicle Checking the front and around the vehicle The panoramic view & front view/wide front view/front split view screen provides support when checking the areas in front of the vehicle and around the vehicle when taking-off at T-intersections or other intersections during poor visibility. To display the screen, press when the shift lever is in D, N (automatic transmission) or with the parking brake disengaged (manual transmission) with the vehicle moving approximately 10 mph (16 km/h) or less. This screen will be displayed if the intuitive parking assist detects an object in front of your vehicle (intuitive parking assist linked display). Screen display Each time the display mode switching button is selected, the mode will change as follows: Panoramic view & front view Distance guide lines Shows distance in front of the vehicle. Display points approximately 3 ft. (1 m) from the edge of the bumper. Intuitive parking assist When a sensor detects an obstacle, the direction of and the approximate distance to the obstacle are displayed and the buzzer sounds. Estimated course lines Shows an estimated course when the steering wheel is turned. This line will be displayed when the steering wheel is turned by 90° or more from the center (straight-line) position. Guide line switching button Select to change the guide line mode between the distance guide line mode and the estimated course line mode. (Switching the guide line mode (panoramic view & front view mode)) Automatic display button Select to turn automatic display mode on/off. (Automatic display mode) Display mode switching buttons The display can be changed to various screens from button combinations. Wide front view Distance guide lines Shows distance in front of the vehicle. Display points approximately 3 ft. (1 m) from the edge of the bumper. Intuitive parking assist When a sensor detects an obstacle, the direction of and the approximate distance to the obstacle are displayed and the buzzer sounds. Automatic display button Select to turn automatic display mode on/off. (Automatic display mode) Display mode switching buttons The display can be changed to various screens from button combinations. Front split view Distance guide lines Shows distance in front of the vehicle. Split view: Display points approximately 1.5 ft. (0.5 m) from the edge of the bumper. Panoramic view: Display points approximately 3 ft. (1 m) from the edge of the bumper. Vehicle width guide lines Shows guide lines of the vehicle’s width including the outside rear view mirrors. Zoom button The front split view, which is currently displayed, can be magnified. Front tire guide lines Shows guide lines of where the front tire touches the ground. Automatic display button Select to turn automatic display mode on/off. (Automatic display mode) Intuitive parking assist When a sensor detects an obstacle, the direction of and the approximate distance to the obstacle are displayed and the buzzer sounds. Note: Pressing on the screen or changes the screen to the previously displayed screen, such as the navigation screen. For details about the intuitive parking assist (Intuitive parking assist*). The display position of the intuitive parking assist and the position of obstacles displayed in the camera image do not match. Warning: When a sensor indicator on the intuitive parking assist display illuminates in red or a buzzer sounds continuously, be sure to check the area around the vehicle immediately and do not proceed any further until safety has been ensured, otherwise an unexpected accident may occur. As the intuitive parking assist display is displayed over the camera view, it may be difficult to see the intuitive parking assist display depending on the color and brightness of the surrounding area. Switching the guide line mode (panoramic view & front view mode) Each time the guide line switching button is selected, the mode will change as follows: Distance guide line Only the distance guide lines are displayed. Estimated course line Estimated course lines will be added to the distance guide lines. Using the vehicle width guide line (front split view mode) The front split view screen displays images from the cameras installed on each outside rear view mirror. This screen is designed to support the driver in safe driving in situations such as when driving on a narrow road, by allowing them to check the areas around the sides of the vehicle. Check the positions and distance between the vehicle width guide line and a target object such as the obstacle or curb of the road. Pull over to the curb as shown in the illustration above, taking care not to let the vehicle width guide line overlap the target object. Ensure that the vehicle width guide line is parallel to the target object. Automatic display mode In addition to screen switching by operating , automatic display mode is available. In this mode, the screen is switched automatically in response to vehicle speed. Each time the “ AUTO” button is selected, automatic display mode is enabled/disabled. In automatic display mode, the monitor will automatically display images in the following situations: When the shift lever is shifted to D, N (automatic transmission) or with the parking brake disengaged (manual transmission). When vehicle speed is reduced to approximately 10 mph (16 km/h) or less. Panoramic view monitor Checking the rear and around the vehicle Checking the rear and around the vehicle The panoramic view & rear view/wide rear view/rear split view screen provide support when checking the areas of behind the vehicle and around the vehicle while backing up, for example while parking. The screens will be displayed when the shift lever is in R. Screen display Each time the display mode switching button is selected, the mode will change as follows: Panoramic view & rear view Intuitive parking assist When a sensor detects an obstacle, the direction of and the approximate distance to the obstacle are displayed and the buzzer sounds. Rear Cross Traffic Alert When a sensor detects an obstacle, the direction of obstacle is displayed and the buzzer sounds. RCD (Rear Camera Detection) When the rear camera detects a pedestrian to the rear. Guide line switching button Select to switch the guide line mode. (Guide lines displayed on the screen) Display mode switching buttons The display can be changed to various screens from button combinations. Center guide line on/off button Select to on/off the center guide line. (Guide lines displayed on the screen) Wide rear view Intuitive parking assist When a sensor detects an obstacle, the direction of and the approximate distance to the obstacle are displayed and the buzzer sounds. Rear Cross Traffic Alert When a sensor detects an obstacle, the direction of obstacle is displayed and the buzzer sounds. Guide line switching button Select to switch the guide line mode. (Guide lines displayed on the screen) Display mode switching buttons The display can be changed to various screens from button combinations. Center guide line on/off button Select to on/off the center guide line. (Guide lines displayed on the screen) Zoom button Each time press the button, the mode will change between the wide rear view mode, narrow rear view mode and hitch view mode. (Changing the rear view mode) RCD (Rear Camera Detection) When the rear camera detects a pedestrian to the rear. Rear split view Intuitive parking assist When a sensor detects an obstacle, the direction of and the approximate distance to the obstacle are displayed and the buzzer sounds. Rear Cross Traffic Alert When a sensor detects an obstacle, the direction of obstacle is displayed and the buzzer sounds. RCD (Rear Camera Detection) When the rear camera detects a pedestrian to the rear. Guide line switching button Select to switch the guide line mode. (Guide lines displayed on the screen) Camera angle adjustment (Using the rear split view) Zoom button (Using the rear split view) Note: The monitor is canceled when the shift lever is shifted into any position other than R. For details about the intuitive parking assist (Intuitive parking assist*), Rear Cross Traffic Alert function (RCTA (Rear Cross Traffic Alert)*) and rear camera detection (RCD (Rear Camera Detection)*) The display position of the intuitive parking assist and the position of obstacles displayed in the camera image do not match. Warning: When a sensor indicator on the intuitive parking assist display illuminates in red or a buzzer sounds continuously, be sure to check the area around the vehicle immediately and do not proceed any further until safety has been ensured, otherwise an unexpected accident may occur. As the intuitive parking assist display and Rear Cross Traffic Alert display are displayed over the camera view, it may be difficult to see the intuitive parking assist display and Rear Cross Traffic Alert display depending on the color and brightness of the surrounding area. Guide lines displayed on the screen Each time the guide line switching button is selected, the mode will change as follows: Estimated course line Estimated course lines are displayed which move in accordance with the operation of the steering wheel. Distance guide lines Shows distance in front of the vehicle. Display points approximately 3 ft. (1 m) from the edge of the bumper. Estimated course lines Shows an estimated course when the steering wheel is turned. Distance guide lines Shows the distance behind the vehicle when the steering wheel is turned. The guide lines move in conjunction with the estimated course lines. The guide lines display points approximately 1.5 ft. (0.5 m) (red) and approximately 3 ft. (1 m) (yellow) from the center of the edge of the bumper. Distance guide line Shows the distance behind the vehicle. Displays a point approximately 1.5 ft. (0.5 m) (blue) from the edge of the bumper. Vehicle width guide lines Displays a guide path when the vehicle is being backed straight up. Vehicle center guide line Indicates the estimated vehicle center on the ground. Parking assist guide line The steering wheel return points (parking assist guide lines) are displayed. This mode is recommended for those who are comfortable with parking the vehicle without the aid of the estimated course lines. Distance guide lines Shows distance in front of the vehicle. Display points approximately 3 ft. (1 m) from the edge of the bumper. Distance guide line Shows the distance behind the vehicle. Displays a point approximately 1.5 ft. (0.5 m) (red) from the edge of the bumper. Vehicle center guide line Indicates the estimated vehicle center on the ground. Vehicle width guide lines Displays a guide path when the vehicle is being backed straight up. Parking assist guide lines Shows the path of the smallest turn possible behind the vehicle. Distance guide line Only distance guide line is displayed. This mode is recommended for those who are comfortable with parking the vehicle without the aid of the guide lines. Distance guide lines Shows distance in front of the vehicle. Display points approximately 3 ft. (1 m) from the edge of the bumper. Distance guide line Shows the distance behind the vehicle. Displays a point approximately 1.5 ft. (0.5 m) (red) from the edge of the bumper. Center guide line When the display is turned ON, the center guide line simultaneously displays the each of the guide lines for the estimated course line, parking assist guide line or distance guide line. Vehicle center line is displayed which move in accordance with the operation of the steering wheel. Vehicle center guide line Indicates the estimated vehicle center on the ground. Note: The display position of the intuitive parking assist and the position of obstacles displayed in the camera image do not match. Warning: Depending on the circumstances of the vehicle (number of passengers, amount of luggage, etc.), the position of the guide lines displayed on the screen may change. Be sure to check visually around the vehicle before proceeding. If the steering wheel is straight and the vehicle width guide lines and the estimated course lines are not in alignment, have the vehicle inspected by your Toyota dealer. Do not use the system if the display is incorrect due to an uneven (hilly) road or a non-straight (curvy) road. Changing the rear view mode Each time press the zoom button, the mode will change as follows: Wide rear view Narrow rear view Hitch zoom view Note: The hitch zoom view can be displayed for a certain time when is pressed while the driving at speeds of 10 mph (16 km/h) or more. The hitch zoom view and bed zoom view (Checking the bed) can be switched when the switch is pressed while the displaying the screen. Using the rear split view If towing a trailer, magnify the difficult to see section of the vehicle rear or change the screen display and use when checking. Zoom button The rear split view, which is currently displayed, can be magnified. Camera angle adjustment button The direction of the camera can be changed from left to right in 5 stages. Parking Using the estimated course line When parking in a space which is in the reverse direction to the space described in the procedure below, the steering directions will be reversed. Shift the shift lever to R. Turn the steering wheel so that the estimated course lines are within the parking space, and back up slowly. Parking space Estimated course lines When the rear position of the vehicle has entered the parking space, turn the steering wheel so that the vehicle width guide lines are within the left and right dividing lines of the parking space. Vehicle width guide line Once the vehicle width guide lines and the parking space lines are parallel, straighten the steering wheel and back up slowly until the vehicle has completely entered the parking space. Stop the vehicle in an appropriate place, and finish parking. Using parking assist guide line When parking in a space which is in the reverse direction to the space described in the procedure below, the steering directions will be reversed. Shift the shift lever to R. Back up until the parking assist guide line meets the edge of the dividing line of the parking space. Parking assist guide line Turn the steering wheel all the way to the left, and back up slowly. Once the vehicle is parallel with the parking space, straighten the steering wheel and back up slowly until the vehicle has completely entered the parking space. Stop the vehicle in an appropriate place, and finish parking. Panoramic view monitor Checking the bed Checking the bed Use to check the state of the load in the carrier bed. Screen display Bed view button Zoom button Note: The bed zoom view can be displayed for a certain time when is pressed while the driving at speeds of 9 mph (16 km/h) or more. The bed zoom view and hitch zoom view (Changing the rear view mode) can be switched when the switch is pressed while the displaying the screen. Panoramic view monitor Magnifying function Magnifying function If displayed objects are too small to see clearly when the panoramic view is displayed, the area around any of the 4 corners of the vehicle can be magnified. Magnifying the display Turn the intuitive parking assist on. Select the area on the panoramic view display you wish to magnify. Touching one of the 4 areas within the dotted lines will magnify that area. (Dotted lines are not displayed on the actual display.) To return to the normal view, touch the panoramic view display again. Note: The magnifying function is enabled when all of the following conditions are met: The panoramic view & front view or the panoramic view & rear view is displayed. The vehicle speed is below approximately 10 mph (16 km/h). The intuitive parking assist is available. In the following situations, the magnified display will be canceled automatically: The vehicle speed is approximately 10 mph (16 km/h) or higher. The intuitive parking assist is unavailable. When the display is magnified, the guide lines will not be displayed. Panoramic view monitor Customizing the panoramic view monitor Customizing the panoramic view monitor The color of the vehicle displayed on the panoramic view monitor can be changed. Changing the body color displayed in the panoramic view monitor Display the moving view/see-through view screen. (Checking around the vehicle) Select . Select the desired color. Panoramic view monitor Panoramic view monitor precautions Panoramic view monitor precautions Area displayed on screen Area of image of panoramic view The panoramic view monitor displays an image of the surrounding view of the vehicle. Since the panoramic view processes and displays images based on flat road surfaces, it cannot depict the position of three-dimension objects (such as vehicle bumpers, etc.) that are in positions higher than the surface of the road. Even if there is room between the bumpers of the vehicles and it seems not likely to collide in the image, in reality, the both vehicles are on a collision course. Check the safety of the surroundings directly. Objects located in the shaded areas will not be displayed on the screen. Parts of objects which extend above a certain height cannot be displayed on the screen. Note: As the images obtained from four cameras are processed and displayed on the standard of a flat road surface; the panoramic view/moving view/see through view may be displayed as follows. Objects may look collapsed; thinner or bigger than usual. An object with a higher position than the road surface may look farther away than it actually is or may not appear at all. Tall objects may appear protruding from the non-displayed areas of the image. Variations in the brightness of the image may appear for every camera. The displayed image may be shifted by inclination of the vehicle body, change in vehicle height, etc., depending on the number of passengers, amount of luggage, fuel quantity, etc. If the front doors or tailgate are not completely closed; neither the image nor the guide lines are displayed. The position relations of the vehicle icon and the road surface or obstacle may differ from the actual positions. The black areas of the vicinity of the vehicle icon are areas that are not captured by the camera. Images like the following are combined, thus some areas may be difficult to view. Warning: When a sensor indicator on the intuitive parking assist display illuminates in red or a buzzer sounds continuously, be sure to check the area around the vehicle immediately and do not proceed any further until safety has been ensured, otherwise an unexpected accident may occur. Area of the image captured by the camera Panoramic view & front view Front split view Panoramic view & rear view The area around both corners of the bumper will not be displayed. Wide rear view The area around both corners of the bumper will not be displayed. Rear split view The area able to be seen changes depending on the camera angle adjustments. When the camera angle is in the middle (Left: 50%/Right: 50%) When the camera angle is at the MAX on the left side (Left: 100%) Hitch zoom view Bed view Note: The area covered by the camera is limited. Objects which are close to either corner of the bumper or under the bumper cannot be seen on the screen. The area displayed on the screen may vary depending on vehicle orientation or road conditions. The camera uses a special lens. The distance in the image displayed on the screen will differ from the actual distance. In the rear split view, there is a blind spot due to the size (length and height) of the trailer. In the hitch zoom view, if a backlit license plate is equipped it may be reflected in the screen. In the bed zoom view, the section near the cabin is a blind spot. The camera The cameras for the panoramic view monitor are located as shown in the illustrations. Front camera Side cameras Rear camera Bed camera Using the camera If dirt or foreign matter (such as water droplets, snow, mud, etc.) is adhering to the camera, it cannot transmit a clear image. In this case, flush it with a large quantity of water and wipe the camera lens clean with a soft and wet cloth. Notice: The panoramic view monitor may not operate properly in the following cases. If the camera is hit, the position and mounting angle of the camera may change. As the camera has a water proof construction, do not detach, disassemble or modify it. This may cause incorrect operation. When cleaning the camera lens, flush the camera with a large quantity of water and wipe it with a soft and wet cloth. Strongly rubbing the camera lens may cause the camera lens to be scratched and unable to transmit a clear image. Do not allow an organic solvent, car wax, window cleaner or a glass coating to adhere to the camera. If this happens, wipe it off as soon as possible. If the temperature changes rapidly, such as when hot water is poured on the vehicle in cold weather, the system may not operate normally. When washing the vehicle, do not apply intensive bursts of water to the camera or camera area. Doing so may result in the camera malfunctioning. Do not expose the camera to strong impacts as this could cause a malfunction. If this happens, have the vehicle inspected by your Toyota dealer as soon as possible. Difference between the screen and the actual road The distance guide lines and the vehicle width guide lines may not actually be parallel with the dividing lines of the parking space, even when they appear to be so. Be sure to check visually. The distances between the vehicle width guide lines and the left and right dividing lines of the parking space may not be equal, even when they appear to be so. Be sure to check visually. The distance guide lines give a distance guide for flat road surfaces. In any of the following situations, there is a margin of error between the guide lines on the screen and the actual distance/course on the road. When the ground behind the vehicle slopes up sharply The distance guidelines are projected on a horizontal surface, distances on an upward sloping surface appear farther from the vehicle than the actual distance. Because of this, objects will appear to be farther away than they actually are. In the same way, there will be a margin of error between the guidelines and the actual distance/course on the road. When the ground behind the vehicle slopes down sharply The distance guidelines are projected on a horizontal surface, distances on an downward sloping surface appear closer to the vehicle than the actual distance. Because of this, objects will appear to be closer than they actually are. In the same way, there will be a margin of error between the guidelines and the actual distance/course on the road. When any part of the vehicle sags When the vehicle posture tilts due to the number of passengers or the distribution of the load, there is a margin of error between the guide lines on the screen and the actual distance/course on the road. A margin of error Distortion of three-dimensional objects on the screen When there are three-dimensional objects (such as vehicle bumpers, etc.) nearby in positions higher than the surface of the road, take extra care when using the following. Panoramic view display (including magnified display) Since the panoramic view processes and displays images based on flat road surfaces, it cannot depict the position of three-dimension objects (such as vehicle bumpers, etc.) that are in positions higher than the surface of the road. For example, even though it appears that there is space between the bumpers of the two vehicles in the illustration below and they are not likely to collide, in reality, a collision is about to occur. Warning: When a sensor indicator on the intuitive parking assist display illuminates in red or a buzzer sounds continuously, be sure to check the area around the vehicle immediately and do not proceed any further until safety has been ensured, otherwise an unexpected accident may occur. When approaching three-dimensional objects The estimated course lines target flat surfaced objects (such as the road). It is not possible to determine the position of three-dimensional objects (such as vehicles) using the estimated course lines and distance guide lines. When approaching a three-dimensional object that extends outward (such as the flatbed of a truck), be careful of the following. Warning: When a sensor indicator on the intuitive parking assist display illuminates in red or a buzzer sounds continuously, be sure to check the area around the vehicle immediately and do not proceed any further until safety has been ensured, otherwise an unexpected accident may occur. Estimated course lines Since the estimated course line is displayed for a flat road surface, it cannot depict the position of three-dimensional objects (such as vehicle bumpers, etc.) that are in positions higher than the surface of the road. Even if the bumpers of the vehicle is on the outside of the estimated course line in the image, in reality, the vehicles are on a collision course. Estimated course line Three-dimensional objects (such as the overhang of a wall or loading platform of a truck) in high positions may not be projected on the screen. Check the safety of the surroundings directly. The pillar that is diagonal to the parking spot may be displayed perpendicular on the screen. Even if it seems like there will not be a collision, the pillar is diagonal, so there may be collision with the upper part of the pillar. Check the safety of the surroundings directly. Visually check the surroundings and the area behind the vehicle. In the case shown below, the truck appears to be outside of the estimated course lines and the vehicle does not look as if it hits the truck. However, the rear body of the truck may actually cross over the estimated course lines. In reality if you back up as guided by the estimated course lines, the vehicle may hit the truck. Estimated course lines Distance guide lines Visually check the surroundings and the area behind the vehicle. On the screen, it appears that a truck is parking at point . However, in reality if you back up to point , you will hit the truck. On the screen, it appears that is closest and is farthest away. However, in reality, the distance to and is the same, and is farther than and . Panoramic view monitor Things you should know Things you should know If you notice any symptoms If you notice any of the following symptoms, refer to the likely cause and the solution, and re-check. If the symptom is not resolved by the solution, have the vehicle inspected by your Toyota dealer.
Symptom Likely cause Solution
The image is difficult to see The vehicle is in a dark area The temperature around the lens is either high or low The outside temperature is low There are water droplets on the camera It is raining or humid Foreign matter (mud, etc.) is adhering to the camera Sunlight or headlights are shining directly into the camera The vehicle is under fluorescent lights, sodium lights, mercury lights, etc. Back up while visually checking the vehicle’s surroundings. (Use the monitor again once conditions have been improved.)The procedure for adjusting the picture quality of the panoramic view monitor system is the same as the procedure for adjusting the screen display. (Refer to the “ MULTIMEDIA OWNER’S MANUAL”.)
The image is blurry Dirt or foreign matter (such as water droplets, snow, mud, etc.) is adhering to the camera. Flush the camera with a large quantity of water and wipe the camera lens clean with a soft and wet cloth.
The image is out of alignment The camera or surrounding area has received a strong impact. Have the vehicle inspected by your Toyota dealer.
The guide lines are very far out of alignment The camera position is out of alignment. Have the vehicle inspected by your Toyota dealer.
The vehicle is tilted. (There is a heavy load on the vehicle, tire pressure is low due to a tire puncture, etc.) The vehicle is used on an incline. If this happens due to these causes, it does not indicate a malfunction.Back up while visually checking the vehicle’s surroundings.
The estimated course lines move even though the steering wheel is straight There is a malfunction in the signals being output by the steering sensor. Have the vehicle inspected by your Toyota dealer.
Guide lines are not displayed The tailgate is open. Close the tailgate.If this does not resolve the symptom, have the vehicle inspected by your Toyota dealer.
is displayed Battery has been reinstalled. The steering wheel has been moved while the battery was being reinstalled. Battery power is low. The steering sensor has been reinstalled. There is a malfunction in the signals being output by the steering sensor. Have the vehicle inspected by your Toyota dealer.
The panoramic view display cannot be magnified The intuitive parking assist may be malfunctioning or dirty. Follow the correction procedures for malfunctions of the intuitive parking assist. (Intuitive parking assist*)
The see-through view/moving view cannot be displayed