Tires
If you have a flat tireFlat tireEmergency, in case of
If you have a flat tireEmergency tire punctureTires
ReplacingIf you have a flat tireYour vehicle is equipped with a spare tire. The flat tire can be replaced with the
spare tire.For details about tires: TiresWarning:If you have a flat tireDo not continue driving with a flat tire.Driving even a short distance with a flat
tire can damage the tire and the wheel beyond repair, which could result in an accident.Before repairing the tireStop the vehicle in a safe place on a hard, flat surface.Set the parking brake.Shift the shift lever to P (automatic transmission) or R (manual transmission).Stop the engine.Turn on the emergency flashers. (Operating instructions)ToolsSpare tire
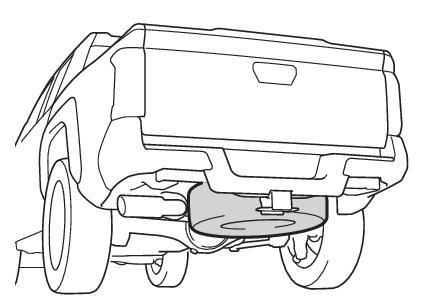
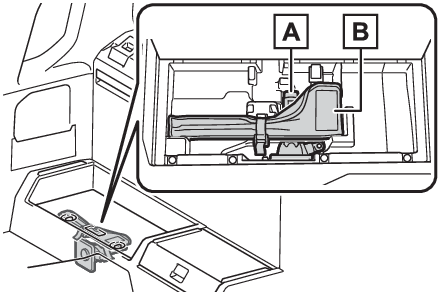
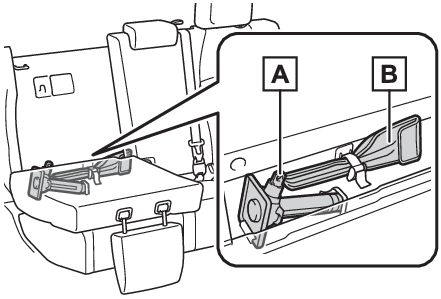
Storage locationLocation of the spare tire, jack and toolsSpare tireJack and toolsVehicles without rear seatsJackTool bagWheel lock key (if equipped)Vehicles with rear seatsJackTool bagWheel lock key (if equipped)Warning:Using the tire jackObserve the following precautions.Improper use of the tire jack may cause the vehicle to suddenly fall off the jack,
leading to death or serious injury.Do not use the tire jack for any purpose other than replacing tires or installing
and removing tire chains.Only use the tire jack that comes with this vehicle for replacing a flat tire.Do not
use it on other vehicles, and do not use other tire jacks for replacing tires on this
vehicle.Put the jack properly in its jack point.Do not put any part of your body under the vehicle while it is supported by the jack.Do not start the engine or drive the vehicle while the vehicle is supported by the
jack.Do not raise the vehicle while someone is inside.When raising the vehicle, do not put an object on or under the jack.Do not raise the vehicle to a height greater than that required to replace the tire.Use a jack stand if it is necessary to get under the vehicle.When lowering the vehicle, make sure that there is no-one near the vehicle. If there
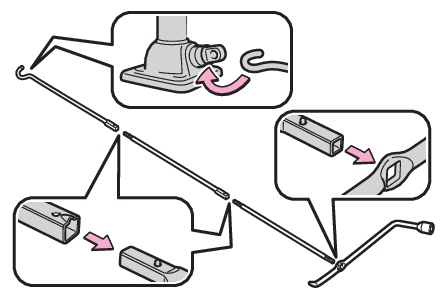
are people nearby, warn them vocally before lowering.Using the jack handleInsert the square head securely until you hear a click to prevent the extension parts
from coming apart unexpectedly.Wheel lock nutWheels
Wheel lock nutWheel lock nut (if equipped)When replacing tires on a vehicle with wheel lock nuts, use the following procedures
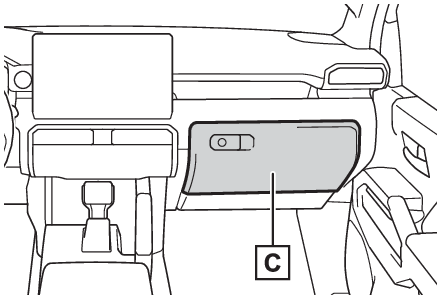
to remove and install the wheel lock nuts. The wheel lock key is stored in the glove
box. Always return the wheel lock key to its original position after use, so that
it does not get lost. (Location of the spare tire, jack and tools)RemovalFor ease of removal, the wheel lock nut should always be the first one loosened.Place the wheel lock key on top of the wheel lock nut, turning until the wheel lock
key and wheel lock nut patterns engage.Place the wheel nut wrench on the wheel lock key, and while applying pressure on the
wheel lock key, loosen the wheel lock nut.InstallationFor ease of installation, the wheel lock nut should always be the last one tightened.By hand, install a wheel lock nut on each wheel.Place the wheel lock key on top of the wheel lock nut, turning until the wheel lock
key and wheel lock nut patterns engage.Place the wheel nut wrench on the wheel lock key, and while applying pressure on the
wheel lock key, tighten the wheel lock nut to the recommended torque.Notice:When using a wheel lock key (if equipped)Do not use an impact wrench. Using an impact wrench may cause permanent damage to
wheel lock nut and wheel lock key. If in doubt about wheel lock application, contact
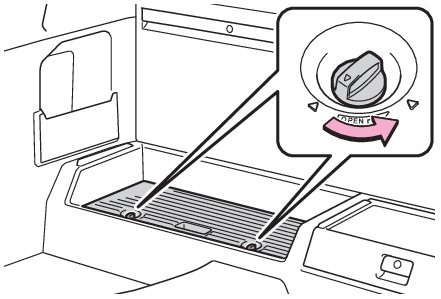
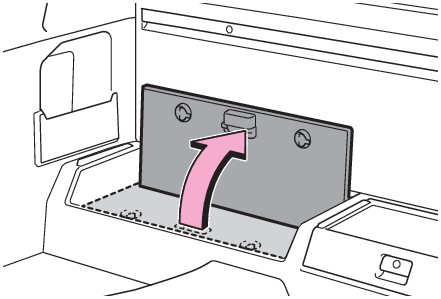
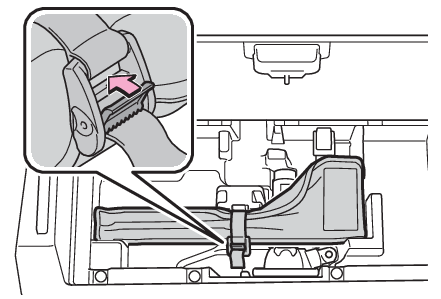
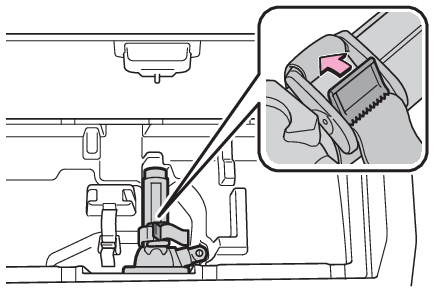
your Toyota dealer.Taking out the jack and tool bagVehicles without rear seatsTurn the knob counterclockwise.Open the lid.Unhook the tightening strap and take out the tool bag.Unhook the tightening strap and take out the jack.After using the jack, install the jack in the exact reverse order from which they
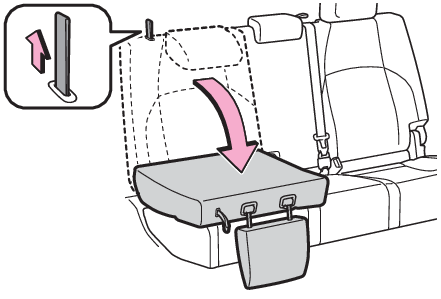
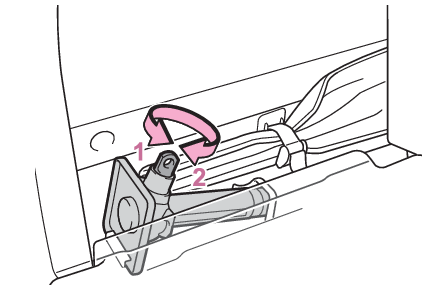
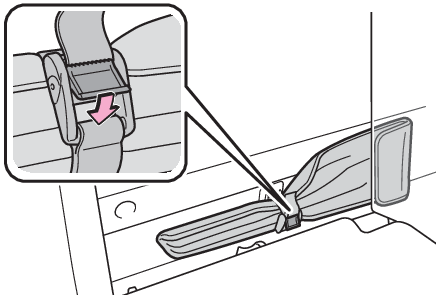
were removed.Vehicles with rear seatsFold the head restraint (Rear seats (If equipped)CenterOuter), and then pull the strap and then fold down the seatback.Loosen and remove the jack.LoosenTightenAfter using the jack, install the jack in the exact reverse order from which they
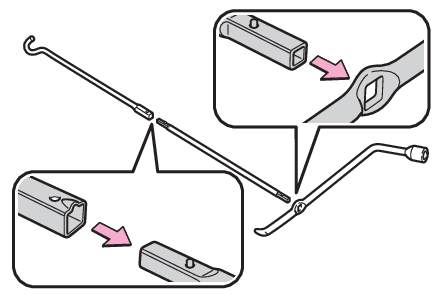
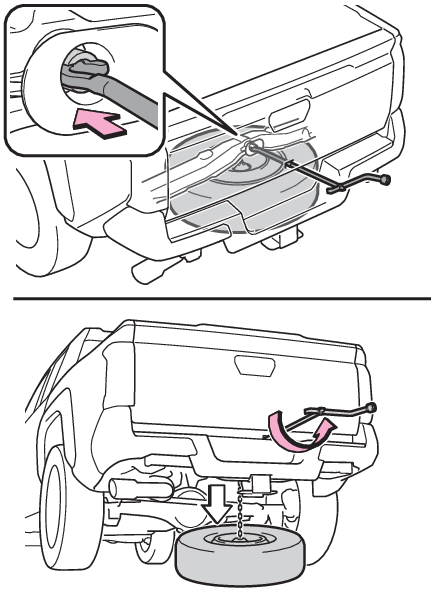
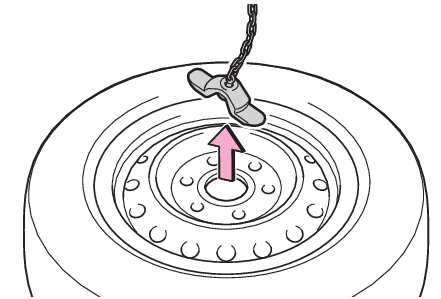
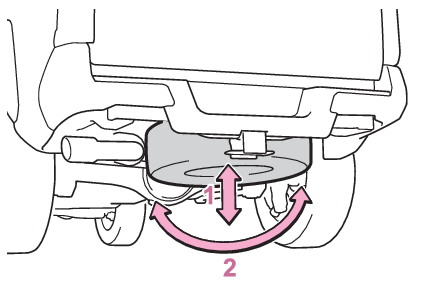
were removed.Unhook the tightening strap and take out the tool bag.Taking out the spare tireAssemble the jack handle extension as shown.Insert the end of the jack handle extension into the lowering screw and turn it counterclockwise.After the tire is lowered completely to the ground, remove the holding bracket.Replacing a flat tireChock the tires.
Tire
Wheel chock positions
Front left-hand side
Behind the rear right-hand side tire
Front right-hand side
Behind the rear left-hand side tire
Rear left-hand side
In front of the front right-hand side tire
Rear right-hand side
In front of the front left-hand side tire
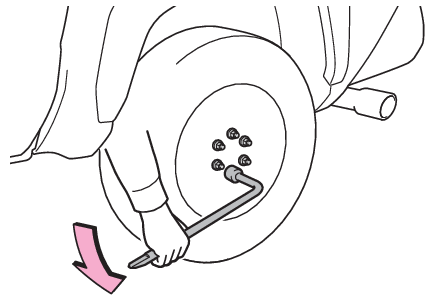
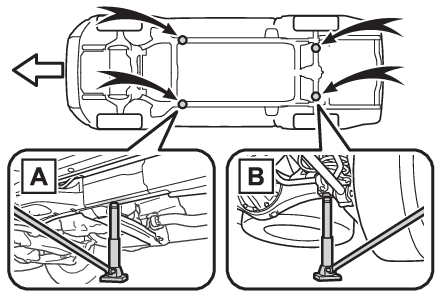
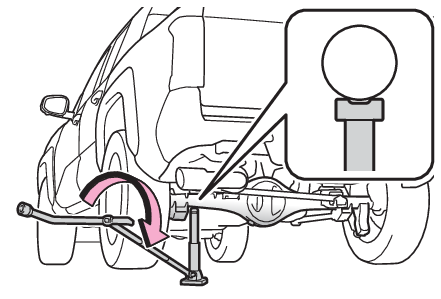
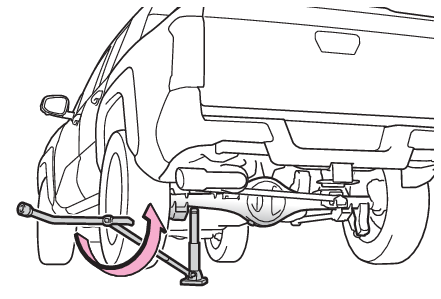
Slightly loosen the wheel nuts (one turn).Vehicles with wheel locks: Use the wheel lock key to loosen the wheel lock.Assemble the jack handle extension as shown.Position the jack at the correct jack point as shown.FrontRearMake sure the jack is positioned on a level and solid place.Raise the vehicle until the tire is slightly raised off the ground.When positioning the jack under the rear axle housing, make sure the groove on the
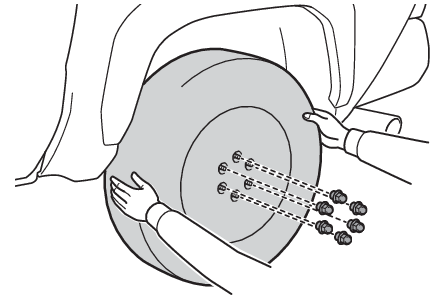
top of the jack fits with the rear axle housing.Remove all the wheel nuts and the tire.When resting the tire on the ground, place the tire so that the wheel design faces
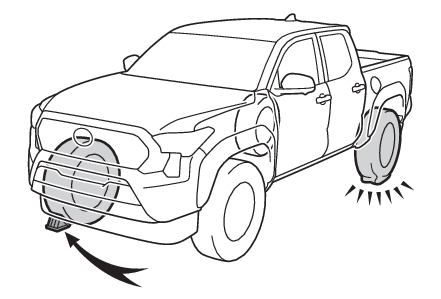
up to avoid scratching the wheel surface.Warning:Replacing a flat tireObserve the following precautions.Failure to do so may result in serious injury:Lower the spare tire completely to the ground before removing it from under the vehicle.Do not try to remove the wheel ornament by hand. Take due care in handling the ornament
to avoid unexpected personal injury.Do not touch the disc wheels or the area around the brakes immediately after the vehicle
has been driven.After the vehicle has been driven the disc wheels and the area around
the brakes will be extremely hot. Touching these areas with hands, feet or other body
parts while changing a tire, etc., may result in burns.Failure to follow these precautions could cause the wheel nuts to loosen and the tire
to fall off, resulting in death or serious injury.Never use oil or grease on the wheel bolts or wheel nuts.Oil and grease may cause
the wheel nuts to be excessively tightened, leading to bolt or disc wheel damage.
Remove any oil or grease that has adhered when installing the wheel nuts.After replacing a tire, check the tightening torque as soon as possible.Steel wheel:
154 ft•lbf (209 N•m, 21.3 kgf•m)Aluminum wheel: 97 ft•lbf (131 N•m, 13.4 kgf•m)When installing a tire, only use wheel nuts that have been specifically designed for
that wheel.Retighten the wheel nuts within 100 miles (160 km) of driving.If there are any cracks or deformations in the bolt screws, nut threads or bolt holes
of the wheel, have the vehicle inspected by your Toyota dealer.Do not attach a heavily damaged wheel ornament, as it may fly off the wheel while
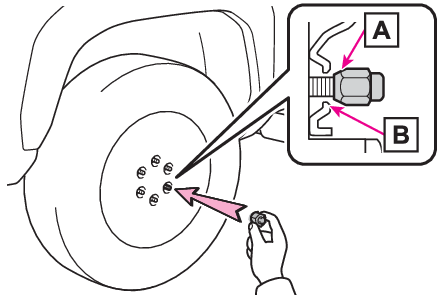
the vehicle is moving.When installing the wheel nuts, be sure to install them with the tapered ends facing
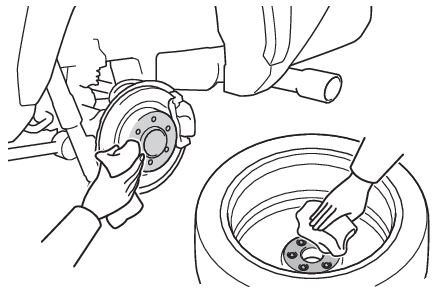
inward.Installing the spare tireRemove any dirt or foreign matter from the wheel contact surface.If foreign matter is on the wheel contact surface, the wheel nuts may loosen while
the vehicle is in motion, causing the tire to come off.Install the spare tire and loosely tighten each wheel nut by hand by approximately
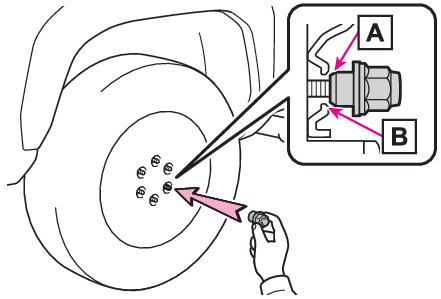
the same amount.When replacing a steel wheel with a steel wheel (including a compact spare tire),
tighten the wheel nuts until the tapered portion
comes into loose contact with the disc wheel seat
.When replacing an aluminum wheel with a steel wheel (including a compact spare tire),
tighten the wheel nuts until the tapered portion
comes into loose contact with the disc wheel seat
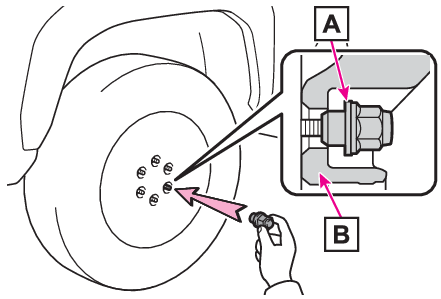
.When replacing an aluminum wheel with a spare aluminum wheel, tighten the nuts until
the washer of the nut
comes into loose contact with the disc wheel
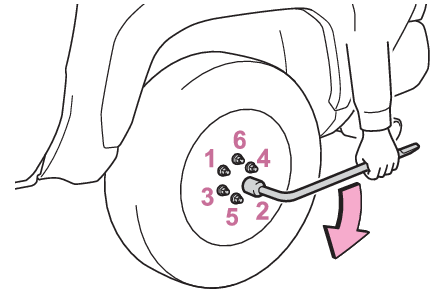
.Lower the vehicle.Securely tighten the wheel nuts two or three times in the order shown in the illustration
using a wheel nut wrench.Tightening torque:Steel wheel: 154 ft•lbf (209 N•m, 21.3
kgf•m)Aluminum wheel: 97 ft•lbf (131 N•m, 13.4 kgf•m)Warning:Stowing the flat tireFailure to follow steps listed under stowing the tire may result in damage to the
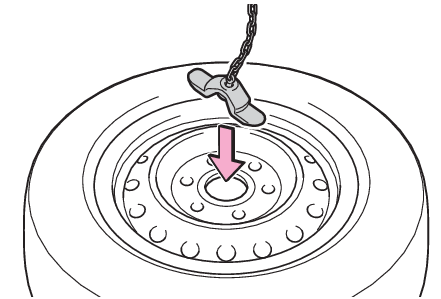
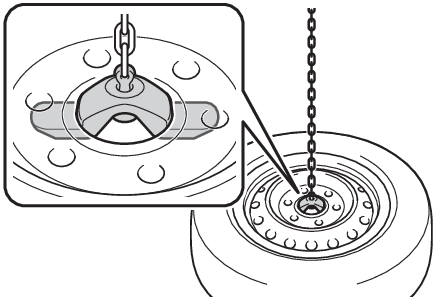
spare tire carrier and loss of the tire, which could result in serious injury or death.Stowing the flat tire, jack and all toolsRemove the center wheel ornament by pushing from the reverse side.Lay down the tire with the valve stem facing up and install the holding bracket.Turn
the jack handle extension clockwise to take up slack in the chain.Check to ensure the holding bracket is centered in the wheel hub.While raising, secure the tire, taking care that the tire goes straight up without
catching on any surrounding parts, to prevent it from flying forward during a collision
or sudden braking.Tightening torque:34.7 ft•lbf (46.6 N•m, 4.8 kgf•m)Confirm it is not loose after tightening:Push and pull the tireTry rotatingVisually check to ensure tire is not hung on surrounding parts.If looseness or misassembly exists, repeat step 2 and step 4.Repeat step 5, any time the tire is lowered or disturbed.Stow the tools and jack securely.Note:The temporary spare tireYour vehicle is equipped with a temporary spare tire that may be a different size,
tread type, and/or manufacturer from the ground tires installed on your vehicle.The temporary spare tire is identified by the “
TEMPORARY USE ONLY” marking on the disc wheel and/or tire sidewall.Use the temporary spare tire temporarily,
and only in an emergency.Make sure to check the tire inflation pressure of the temporary spare tire. (Tires and wheels)After completing the tire changeThe tire pressure warning system must be reset. (Initializing the tire pressure warning system)When using the temporary spare tireAs the temporary spare tire is not equipped with the tire pressure warning valve and
transmitter, low inflation pressure of the spare tire will not be indicated by the
tire pressure warning system. Also, if you replace the temporary spare tire after
the tire pressure warning light comes on, the light remains on.If you have a flat rear tire on a road covered with snow or iceInstall the temporary spare tire on one of the front wheels of the vehicle. Perform
the following steps and fit tire chains to the rear tires:Replace a front tire with the temporary spare tire.Replace the flat rear tire with the tire removed from the front of the vehicle.Fit tire chains to the rear tires.Warning:When using the temporary spare tireRemember that the temporary spare tire provided is specifically designed for use with
your vehicle. Do not use your temporary spare tire on another vehicle.Do not use more than one temporary spare tires simultaneously.Replace the temporary spare tire with a standard tire as soon as possible.Avoid sudden acceleration, abrupt steering, sudden braking and shifting operations
that cause sudden engine braking.When the spare tire is attachedThe vehicle speed may not be correctly detected, and the following systems may not
operate correctly:ABS & Brake assistVSCTRACAUTO LSD (if equipped)PCS (Pre-Collision System)AHB (Automatic High Beam)LTA (Lane Tracing Assist)LDA (Lane Departure Alert)Dynamic radar cruise controlCruise controlEPSTrailer Sway ControlTire pressure warning systemBSM (Blind Spot Monitor) (if equipped)RSA (Road Sign Assist) (if equipped)Panoramic view monitor (if equipped)Multi-terrain Monitor (if equipped)Toyota parking assist monitor (if equipped)PKSB (Parking Support Brake) (if equipped)RCTA (Rear Cross Traffic Alert) (if equipped)Navigation system (if equipped)Also, not only can the following system not be utilized fully, but it may even negatively
affect the drive-train components:4WD system (if equipped)Speed limit when using the temporary spare tireDo not drive at speeds in excess of 50 mph (80 km/h) when a temporary spare tire is
installed on the vehicle.The temporary spare tire is not designed for driving at high speeds. Failure to observe
this precaution may lead to an accident causing death or serious injury.Notice:Do not drive the vehicle with a flat tireDo not continue driving with a flat tire.Driving even a short distance with a flat
tire can damage the tire and the wheel beyond repair.Driving with tire chains and the temporary spare tireDo not fit tire chains to the temporary spare tire.Tire chains may damage the vehicle
body and adversely affect driving performance.When stowing the flat tireEnsure that there is no object caught between the tire and the vehicle underbody.When replacing the tiresWhen removing or fitting the wheels, tires or the tire pressure warning valve and
transmitter, contact your Toyota dealer as the tire pressure warning valve and transmitter
may be damaged if not handled correctly.To avoid damage to the tire pressure warning valves and transmittersWhen a tire is repaired with liquid sealants, the tire pressure warning valve and
transmitter may not operate properly. If a liquid sealant is used, contact your Toyota
dealer or other qualified service shop as soon as possible. Make sure to replace the
tire pressure warning valve and transmitter when replacing the tire. (Installing tire pressure warning valves and transmitters)